Wednesday, April 8, 2009

Spring Has Hatched!


Here in the south we are well into spring. God's colorful handiwork is stepping out all around us and putting on quite a show.

I enjoy bringing a touch of the season into my table decor throughout the year, and wanted to share my most recent spring idea with you.


These look lovely as is, but you could easily make these place holders by writing each guest's name on the egg shell with a craft pen or by simply attaching a pretty name tag to the nest with a bit of ribbon or twine. Try dying them for a more colorful look. These would make nice gifts for your guest to take home.


To make this project as shown you will need:


Eggs

A nail or sharp pointy tool (for making hole.)

Antibacterial soap for washing cracked shell thoroughly.

Small shovel or large spoon

Wild violets from yard ( pansies from garden center would work.)

Green moss from yard ( You could used dried from craft store or check with local florist for fresh.)

Potting soil

Spanish moss (for nest) Found at craft store.

Spray Bottle (For misting with water.)


Preparing Eggshell


First, make hole in top of egg by applying gentle pressure and twisting with nail until you pierce the shell all the way through.


Next, you will need to gently chip away small pieces from the shell.


Drain yoke and whites from egg shell.


You will need to carefully wash the inside and outside of the shell with antibacterial soap.


Gently dry shell with soft cloth.


Now, if you haven't already it is time to gather your

plants and other materials listed.


Gather green moss growing in yard or use some you have purchased.


Dig up wild flowers of your choice or use purchased plants.


Organize all supplies into one place.


Now you are ready to fill your egg shell planter.


Shape moss until it resembles a birds nest.


Fill shell halfway with potting soil.


Carefully place plant into shell. Lightly mist with water.


Tear small bits from moss to cover soil. Add pieces until you achieve desired look.


These would be a lovely addition for tea parties, women's luncheons, or a sweet way to brighten up a breakfast tray. I plan on using these on our Easter table this year.

I hope you will give this project a try!


Copyrighted 2009 Alana T.


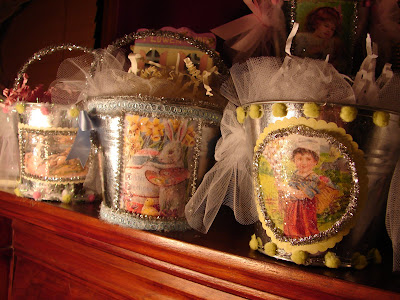
A Tisket A Tasket......

A Bucket Not A Basket!


I've been mulling this "Easter Bucket" idea over in my head for quite sometime, but never seemed to find the time to create them.


I am tickled pink with how they turned out. As I created each one the last I completed became my NEW favorite! Each one is as different as the friends and family who will receive them as gifts. I hope they love them as much as I do!


Making these has inspired me to make more featuring vintage postcard printouts from other holidays. I think these would be a darling alternative to a regular flower girl basket. The possibilities are endless.


To create these you need tin buckets, pastel colored ribbon and trims,( I found mine three for a dollar at Michael's.) silver pipe cleaners, snippets of scrapbooking paper , netting (pastel colored), free vintage Easter postcards available online, buttons, Mod Podge, hot glue and clear glitter( to add a little sparkle to picture), foam brush to apply Mod Podge and scissors.


Copyrighted 2009


Friday, April 3, 2009

Resurrection Cookies


Resurrection Cookies
What a wonderful recipe to share with your children for Easter. My own have enjoyed making these each year.These cookies are made the evening before celebrating the Resurrection, and are cooked in a warm oven overnight so they will be ready on Resurrection Sunday morning.


You need to preheat your oven to 300 degrees (THIS IS IMPORTANT!!! -- don't wait until you are half done with the recipe!)


3 egg whites

1 cup whole pecans

1 tsp. Vinegar

A pinch salt

1 cup sugar

A zipper baggie

A wooden spoon

tape

Bible

( If your children are able have them take turns looking the verses up and reading them aloud or have dad join in by reading them.)


1. Place pecans in zipper baggie and let children beat them with the wooden spoon to break into small pieces. Explain that after Jesus was arrested, He was beaten by the Roman soldiers. Read John 19:1-3.


2. Let each child smell the vinegar. Put 1 tsp. vinegar into mixing bowl. Explain that when Jesus was thirsty on the cross, He was given vinegar to drink. Read John 19:28-30.


3. Add egg whites to vinegar. Eggs represent life. Explain that Jesus gave His life to give us life. Read John 10:10-11.


4.Sprinkle a little salt into each child's hand. Let them taste it and brush the rest into the bowl. Explain that this represents the salty tears shed by Jesus' followers, and the bitterness of our own sin. Read Luke 23:27.


5. So far, the ingredients are not very appetizing. Add 1cup sugar. Explain that the sweetest part of the story is that Jesus died because He loves us. He wants us to know and belong to Him. Read Ps. 34:8 and John 3:16.


6. Beat with a mixer on high speed for 12 to 15 minutes until stiff peaks are formed. Explain that the color white represents the purity in God's eyes of those whose sins have been cleansed by Jesus. Read Isa. 1:18 and John 3:1-3.


7.Fold in broken nuts. Drop by teaspoons onto wax paper covered cookie sheet. Explain that each mound represents the rocky tomb where Jesus' body was laid. Read Matt. 27:57-60.


8. Put the cookie sheet in the oven, close the door and turn the oven OFF. Give each child a piece of tape and seal the oven door. Explain that Jesus' tomb was sealed. Read Matt. 27:65-66.


9. GO TO BED! Explain that they may feel sad to leave the cookies in the oven overnight. Jesus' followers were in despair when the tomb was sealed. Read John 16:20 and 22.


10. On Resurrection morning, open the oven and give everyone a cookie. Notice the cracked surface and take a bite. The cookies are hollow! On the first Resurrection, Jesus' followers were amazed to find the tomb open and empty. Read Matt. 28:1-9


Wednesday, April 1, 2009

Welcoming Spring


BRAVO!

The Great Conductor raises His baton, and
directs His creation; at His direction the sun obeys
and wraps the earth in light and bathes it in warmth
and the music begins. With each movement of
His hand creation awakes. A new day is born.

The morning is clothed with glistening jeweled
drops of moisture. The air carries a light, cool, lacy
mist. The fragrance of green, living growing life
hangs heavy in the air. The stage is set. Life stirs at
the Great Conductor's bidding.


The birds are delighted with the cool, fresh,
green morning and the delight brings forth song
filled with splendid vigor. They sing for Him. The
cool, crispness of the day makes them frolic and
dance. The rich, moist earth presents great bounty.
The glistening grass holds treasure.


The warmth of the sun beckons the flowers from
their slumber. A symphony of song greets them as
they stretch to take a peek. The whole earth sings as
though to praise the Great Conductor.


My soul is full, my heart feels glad, and as the
birds frolic and play and harvest their treasure, I too,
harvest mine.

By Alana T. copyrighted 2007


Tuesday, March 17, 2009

Top O'The Day To Ya!

I just had to share these vintage St. Patrick's Day greetings. Hope you enjoy them as much as I have. I especially like the one of the little girl and her dog. Hmmm....I'm thinking I might just have to come up with a craft idea using these beautiful greetings for next year!


May your blessings outnumber the shamrocks that grow, and may trouble avoid you wherever you go.~Irish Blessing


Wednesday, March 11, 2009

Civil War Adventures At Stones River

Our most recent civil war adventure took place not too far from Nashville at Stones River National Battlefield in Murfreesboro, Tennessee. We really had a great time there. The activities of the day were quite interesting for the children and the adults as well.


The boys especially enjoyed the battle demonstrations which included firing cannons. The children enjoyed interacting with the reenactors who seemed equally thrilled in the fact that the children wanted to carry on a conversation with them. My oldest even got a penny whistle lesson from one of them. I was quite impressed with how he progressed at playing it in just a day.


Papaw stopped for a picture with his grandchildren.


Sugar & Spice


And Everything Nice


They were discussing hat styles.


Getting ready to fire the cannons.


It was VERY loud. The boys loved it.


I always pick out a favorite reenactor.


Reenactors preparing for demonstration.


Too CUTE!


Enjoying the warmth of the fire and fun conversation.


Penny Whistle Lessons


My son giving it a try.


He really played well.


My niece was a little frightened of my "favorite" reenactor, but my daughter posed for a photo.


The boys especially enjoyed this demonstration.


Stones River


Oh what memories we have been making!


I loved this shot of my oldest son and youngest nephew.


If you are interested in planning a visit or learning more about the battle that occurred at Stones River National Battlefield check out the links below.


http://www.nps.gov/stri/index.htm